
Learn how to replace the broken screen of your iPhone 14 with our step-by-step iPhone 14 Screen Replacement guide.#
Apple’s iPhone 14 features a 6.1-inch large display protected by ceramic shield glass. Accidentally dropping your iPhone can lead to screen breakage. This is a frustrating situation. But the good news is that you can replace the screen by yourself.
Without any delay let’s start replacing the cracked screen of your iPhone 14!
Step 1 Prepare The Mobile Repairing Tools

Collect all these useful mobile repairing tools to replace the broken screen of your iPhone 14:
- A plastic opening pick
- A suction cup
- A set of screwdrivers
- A Hot Gun or Hair dryer
- A spudger
- A pair of tweezers
- Packing Tape
- Adhesive Tape
- New iPhone 14 Screen Replacement
Step 2 Prepare Your iPhone 14


Unplug all the wires from your iPhone 14. Follow these few steps to power off your iPhone 14:
- Press and hold the Power Button and Volume Up Button simultaneously.
- Wait for a few seconds.
- The Power OFF option will pop up on the screen.
- Slide the Power OFF slider to the right.
- Your iPhone will power off.
Alternative Method
- Open your iPhone 14 Settings
- Go to General settings
- Choose the Shut Down option
Step 3 Unscrew The Pentalobe Screws


- Locate the two 6.8 mm-long pentalobe screws at the bottom edge of your iPhone 14.
- Take a screwdriver to remove these screws.
Step 4 Heat The iPhone 14 Screen


- Adjust medium heat settings on your hot air gun or hair dryer. You can also use a hot plate to heat your iPhone 14 for 1 minute.
- Heat all sides of your iPhone screen for at least 3 to 5 minutes.
- Heat will soften the adhesive glue.
- Keep the hot air gun or hairdryer at least 5 cm away from your iPhone 14.
- Do not overheat the iPhone. Too much heat can damage your iPhone.
Important Tips
- Apply transparent packing tape on the cracked screen of your iPhone 14 to avoid any physical harm.
- Wear safety glasses and gloves to protect your eyes and hands.
Step 5 Take A Suction Cup

- Fix a suction cup near the bottom edge of your iPhone’s screen.
- Firmly hold and pull the suction cup handle to create a gap between the screen and the iPhone 14 frame.
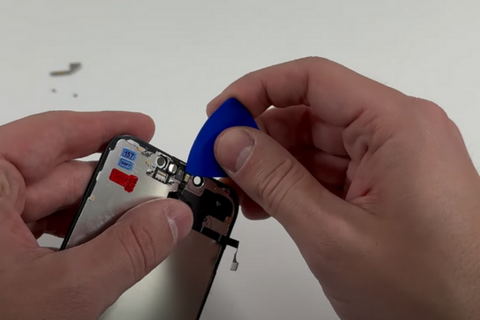
Step 6 Use The Opening Pick

- Take a plastic pick or tool.
- Mark 3mm on the opening pick or tool with the help of a meter rule.
- Enter the pick in the gap between the screen and the iPhone 14 frame.
- Remove the suction cup.
Important Tip
- Always remember there are two flex cables on the left side of your iPhone.
- Do not insert the pick over 3mm inside the gap to avoid hardware damage.
Step 7 Slice The Bottom Adhesive


- Move the pick from the lower right to the lower left corner twice to cut the bottom adhesives.
Step 8 Remove The Left Adhesive


- Slide the plastic opening pick from the lower left to the upper left corner of your iPhone 14 to slice the left adhesive.
Step 9 Cut Through The Upper Adhesive


- Keep sliding the plastic opening pick from the upper left to the upper right corner.
Step 10 Remove The Right Adhesive


- Now move the opening pick from the upper right to the lower right corner of your iPhone 14.
Step 11 Prop Up The Screen

- Hold the screen in your fingers.
- Open the screen like a book.
- Hold the screen upright to disconnect the two flex cables connected to the iPhone frame.
Step 12 Unfasten The Display Cable Bracket

- Remove the 0.9 mm long screw securing the display connector bracket with the help of a screwdriver.
Step 13 Remove The Display Cable Bracket

- Hold the display cable bracket with a pair of tweezers or your fingers.
- Remove the display cable.
Step 14 Disconnect The Display Cable

- Unclip the display cable with the help of a spudger or prying tool.
Step 15 Unfasten The Front Sensor Connector Cover

- Unfasten the 0.9 mm-long screws securing the front sensor connector bracket with a screwdriver.
Step 16 Remove The Front Sensor Connector Cover

- Hold and lift the bracket to separate the front sensor connector bracket from the iPhone.
Step 17 Detach The Front Sensor Cable

- Unclip the front sensor cable and press the connector with a spudger or prying tool.
Step 18 Remove The Screen Of Your iPhone 14

- Separate your iPhone 14 screen from the frame.
- Keep it aside.
Step 19 Unfasten The Front Sensor Bracket

- The next steps will explain how to transfer the front sensor assembly to your new iPhone 14’ screen replacement.
- If the screen replacement for your iPhone 14 includes a front sensor assembly, you can skip these steps.
- Unfasten the two 1.4 mm-long screws securing the sensor assembly bracket.
Step 20 Remove The Front Sensor Bracket

- Remove the front sensor bracket.
Step 21 Heat The Front Sensor Assembly

- Use a hot air gun or hair dryer to heat the front sensor assembly of your iPhone screen for 1 to 2 minutes.
Step 22 Disconnect The Light Sensor

- Lift the proximity sensor from the screen with an opening pick.
- Hold the proximity sensor cable and remove it from the screen.
Step 23 DetachThe Microphone
- Place an opening pick under the microphone cable.
- Slide the pick around the microphone to remove its adhesive.
Step 24 Remove The Front Sensor Assembly

- Enter a plastic pick under the front sensor assembly.
- Slide the pick to separate it from the iPhone’s frame.
Step 25 Reassemble Your iPhone 14


- Install the front sensor and microphone to their slots in the new screen replacement.
- Use new adhesive tape to attach all the components to their place.
- Remove old adhesive around the edges of your iPhone 14 frame with the help of Isopropyl Alcohol.
- Reconnect the Front sensor and Display cables to your iPhone 14.
- Tighten up the Front sensor and Display cable brackets.
- Attach the new screen to your iPhone 14.
Wrapping Up
Congratulations! You have successfully learned how to replace the broken screen of your iPhone 14 with our easy step-by-step instructions. Turn on your iPhone 14 and test the touch sensitivity of your iPhone’s new screen.